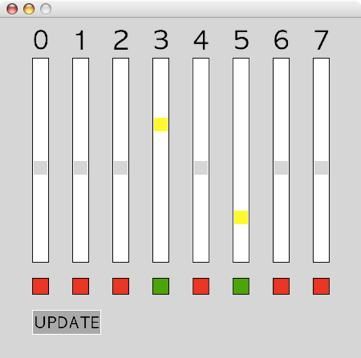

The point of this project was to get the Pololu Micro Serial Servo Controller , working with my Mac. It was easy enough to send serial data to it though one of my USB to serial adapters, but I thought it would be more fun to control the servos with software, and build something other people could use.
Having recently found The Processing programming language, I though this would be an good project to build incorporating the Arduino . Here is the result.


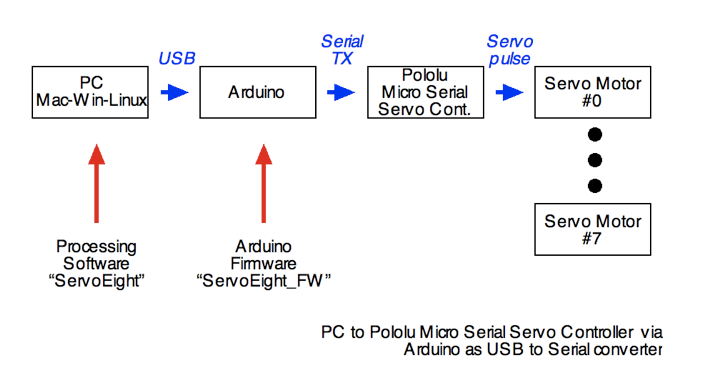
2. The Arduino receives the data from the PC. It then checks to make sure it is in the format that it can use; three 8 bit bytes, First byte is the start byte which must be 255, the second is the servo number 0 to 15 and the third is the position which must be from 0 to 254. (This is Scott Edwards Electronics, MiniSSC Mode, ie protocol selection jumper is on.)
3. If all of these conditions are meet, then the Arduino pumps the data out on the TX pin, which is connected to the MSSC’s logic level serial input pin.
4. The MSSC moves the selected servo to the desired position.

1. After the user moves a slider in the ServoEight software, the software sends out a conditioned “serial” signal to the Arduino board via USB. If your Arduino is installed and working then the FTDI USB to serial drivers are already installed on your computer.


1. Get the hardware; an Arduino Diecimila, the Pololu Micro Serial Servo Controller , 1 to 8 hobby servos, a power supply (eg. 6 volt battery)
2. Connect the Arduino to you PC using a USB cable. Hook-up the power to the Arduino and the MSSC as indicated in their spec sheets. The only other connection is from the TX pin 1 on the Arduino to the logic level serial input pin on the MSSC.
3. Download Arduino code (see below), compile and load it into you Arduino.
4. Download Application (or the source code for processing) for you platform (see below). (Note: If you don’t have an Ardunio connected and working your ServoEight will freeze when it tries to send serial data to a “not available” serial port.)
5. In the application window that appears click the red square under the servo that you want to control. The square button is a toggle on and off.
6. Slide the slider and the servo will move when you release the mouse button. (Be careful, you can most often move the slider to a point beyond the range of your servo, so if you servo goes to the end of its rotation then sits there and “growls” back off a bit right away!)
7. You may also, move the sliders then activate the servo, and click on the update to move them.
1. The Micro Serial Servo Controller is quite sensitive to electrical noise, so use a separate power supply for the servo motors, but remember to have a common ground. (I could not get the MSSC to work at all, while it shared power with the motors.)
2. After you program the Arduino you will have to power cycle the MSSC, since the serial signals that are sent to the Arduino are passed through to the MSSC. For safety the MSSC goes into a “safe mode” when it receives “garbage” data.
3. On receipt of the first valid data the MSSC, will “jerk” all of the servos.
Here is a list of things that I would like to change. I might not have the time, so if you are up to it, download the source code and improve away!
1. Only update the servo that is being adjusted. (Now it updates each active servo, which makes it a bit sluggish)
2. Numerical display of position data.
3. A way to set min and max for each servo.
4. Adding a form of sequencer to program a series of movements.
5. Nicer looking graphics.
6. A way to choose the serial port from a list of available ports.

Copyright SpikenzieLabs 2019